
Heritage and Modern Brick Manufacturing: An Overview
Brick is brick, however beyond the initial aesthetics there are many, less obvious characteristics of new brick that to restoration are much more relevant. The first step to understanding how important it is to match your historic brick during a restoration is to understand the difference between a heritage clay brick and a modern clay brick. The first thing to note is that a century of advancements have been made towards increasing production and reducing the cost of manufacturing brick. Our brick industry that was once comprised of numerous small scale operations utilizing unique local deposits of clay to manufacture brick with a high degree of direct human labour, has made way for a highly mechanized approach targeting massive deposits outputting very consistent brick in size, colour and permeability
Modern Manufacturing
Modern bricks are manufactured primarily from shale, mined from deposits of soft, finely stratified sedimentary rock that formed from the compaction of silt and clay minerals we would ordinarily view as mud. These rock hard shale deposits, once mined the shale is left exposed to the elements for 2-3 years to facilitate the proceeding grinding processes. A extremely fine, and consistent powder is ground and then milled in a pug mill. In the pug mill the ground up stone and clay is mixed with a precise amount of water to, minimize the time required to for drying and achieve the expected shrinkage during firing to end up with a unit within parameter. The next step is this clay is compressed to remove the air from the mix and it is extruded at high pressure through a rectangular die, creating a long slug of brick material. An identifying marker of an extruded brick 3 holes which is integral to the rectangular die.

At this point the slug is coated with a fine dust of metal oxides which will give the brick its colour during the firing process. Providing a measured amount of oxides instead of relying upon the natural elemental makeup of the deposit further aids in the consistency of the final product. Now because the the surface of the slug is perfectly smooth without imperfections, artificial inconsistencies are introduced by means of a textured roller. This now oxide coated, artificially textured slug of clay is cut into 5-10 foot lengths to be gang cut with a row of wires into its final pre firing dimension.
The objective hereon out is to move the brick thought the rest of the process with minimal interference to prevent any deformation. The brick is robotically stacked onto carts 10 feet high in dried in large hot air kilns, this process takes about 2 days. From here the still hot bricks are rolled into a natural gas or oil fired furnace to be fired at a precise heat, about 1000°C. From here all processing relevant to this discussion has occurred and the brick is, cooled, stack, and transported.

Heritage Manufacturing
To this point we have discussed the process of manufacturing brick from shale deposits. The first thing it is important to understand about heritage clay brick is that they were typically manufactured from brick earth, apposed to brick clay or shale. We can think them as surface clay and deep clay, respectively. The brick earth is a superficial deposit of homogenous loam or silt. These discontinuous deposits were typically created by wind blown dust deposited under very dry conditions. These deposits are close to the surface, often have extensive organic matter and are much smaller than the deeper shale deposits.
Historically this clay was the standard for manufacturing bricks. The clay was excavated during the late summer and fall for use the following spring and summer. The clay once excavated is carefully washed and seized to remove stones and organic matter. Depending on the quality and purpose of the brick different methods would be employed. Often this washed and sieved clay would be brought to settling bays where the soupy mixture of clay would separate from the water sinking into a consolidated layer. Again depending on the use the raw clay could be left in these covered bays for up to three years, but typically this wasn’t the case.

Regardless of its time mellowing in settling bays the brick would be brought to a mill in preparation for brick moulding. These mills were metal or wooden tub with a central shaft from which horizontal or later, spiral blades projected. The clay was fed into the top, kneaded by the rotating blades to be extruded from the bottom.
The milled clay is now in the proper state for shaping into bricks. This tasked is preformed by the moulder at a bench with a water and/or sand trough for use in the moulding process. The process being described here is called the soft mud process. The moulds used for this are rectangular bottomless boxes known as stocks. Due to the high water content of the clay (soft mud) these moulds were oversize to allow for contractions during the drying and firing. The mould is placed on a board fixed to a bench, if the brick had lettering or a frog (indent) this board is where a raised block would be placed. This wooden mould would be dampened by dipping it into the trough of water in a process known as ‘slop moulding’, or the mould would be dusted with sand in a process known as ‘sand moulding’.

The moulder dusts the bench and mould with sand and pulls out a portion of clay from a large often kneaded lump beside him. This is rolled to form in to a ‘clot’ about the size of the mould. The moulder then lifts this with both hands above his head and slams it down hard into the mold so as to completely fill it. Using a wire or straight edge wood scraper, the excess clay from the top of the mould is cut and removed. Often the top of the brick which was cut would be smoothed with a wet hand or a wet piece of softwood called a strike. The mould was then lifted up and emptied on a long board with other newly molded bricks ready to be carried away for drying. The number of bricks a moulder can make in a day was depending on quite a few variables, but a good average was about 1,000 bricks.
These freshly moulded or ‘green’ bricks now had to be thoroughly dried before being fired. Drying ensures the brick does not warp or shrink unevenly. The drying, especially when using the soft mud process versus the stiff mud process, allows the brick to become sufficiently rigid such that they can be handled and stacked into a kiln. This drying process was usually achieved outdoors in unheated drying racks.

In this method the bricks are stacked in two long rows about seven courses high. Other courses are laid out parallel to these and can become many hundred feet long. The bricks are set on edge with a finger width between them allowing for airflow and effective drying. This drying stage takes about three to six weeks.
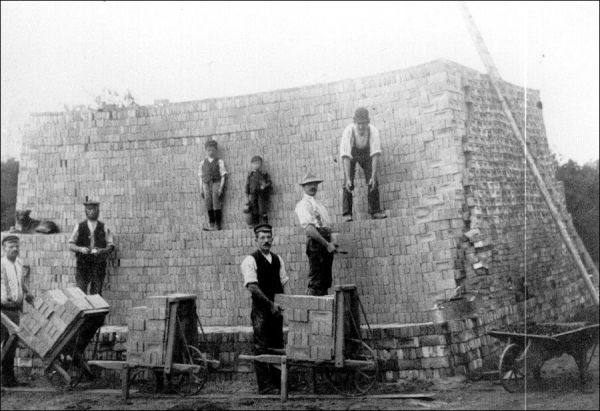
The final stage of manufacturer of a heritage brick is the firing, which historically took place in a clamp or a kiln. A clamp is the most basic type of kiln, it essentially consists of a pile of dried green bricks interspersed with combustible material. It was also not uncommon for brick to be moulded with fuel material such as coal to aid in the firing process.
A flat dry area of land is chosen, and a layer of perviously fired bricks are laid down over an area of approximately 30’ x 30’. Previously fired bricks are used to construct the base and the outer casing of the clamp structure. If no fired bricks were available the entire kiln would be constructed entirely of green or raw bricks. The main component of the clamp were the firing tunnels. These tunnels were 2 bricks wide at the base, sided with raw bricks stacked finger width apart. Beginning with the seven layer and continuing to the ninth the bricks progressively stepped out to form the tunnel roof. This pattern is known at corbeling. Once the roof of the tunnels were completed the layers were continued with the same finger width spacing arranged perpendicular to the layer below. Once the entire construction with raw bricks is complete, the outside of the clamp must be sealed with mud. This insulation was necessary to prevent excessive heat loss from the kiln during firing. When a kiln is well insulated, the bricks will be fired better and use less fuel.
These kilns were very slow to fire and require constant supervision. It was not uncommon for one firing to take 2 weeks for start to finish. Firing was preformed at low heat for 2-3 days to further dry the raw bricks. Steam could be seen coming from the top of the kiln during this stage. As the water evaporated and the gases cleared, fuel would be added increasing the intensity of the fires. If this was done to soon the steam created in the bricks would cause them to explode. Intense fires were maintained in the fire tunnels around the clock for a week until the temperatures of 1000°C were reached. This was measured by the glow put off by the fired bricks. At this point the fire tunnels were bricked over and the heat slowly dissipated over the next week.
Next the kiln was disassembled and the bricks were sorted based on the extent of the firing. Some bricks close to the fire received a natural glaze caused by sand falling into the firing and the vaporized silica being deposited on the bricks. These were klinker or over fired bricks, reaching nearly a ceramic state. They were often used for garden paths. The under fired bricks, had a high porosity and were used on the inner most course. Their high air content helping insulate the structure. Finally the best bricks not over or under fired were chosen to be used on the exterior walls of the building.
Clays with a ferric oxide content of 5-9% and an alumina content of 10-22% with a low lime levels produce all shades of red. The higher the temperature the darker the colour under oxidizing conditions. From a salmon colour (an under-fired brick used on interior courses and often referred to as a salmon) to dark red and black when the bricks hit a state just short of complete vitrification.
Gault clays have a lime content that may reach 20% and although these clays still have a moderate content of ferric oxide nearing that of red brick clay, these bricks can be fired to yield a nearly white brick. Gault clay at 1,000°C produces a pink to brown shade, becoming cream after prolonged firing at 1,050°C.